Volleyball.Com is here to help you build your own volleyball court whether that’s an indoor court or outdoor sand volleyball court. Use this guide to get started! Questions? contact us today!
Net Height: Net height is 7′ 11 5/8″ for men and 7′ 4 1/8″ for women. Co-ed competition is played on a men’s height net. The official height measurement is made in the center of the net. The height of the net at the sidelines can be no more than 3/4″ higher than the official height. If you’re playing on sand, the measurements are made with the sand raked level, and no accommodation is made for your feet sinking in the sand. If you’re playing on grass, the measurements are made to the ground, and not the top of the grass.
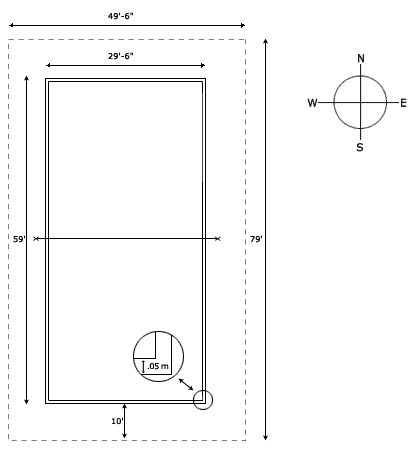
The Site: The dimensions of a volleyball court are 29′-6″ wide by 59′-0″ long, measured from the outside edges of the boundary lines. In addition, you should have 10′ (more is even better) clear around the boundaries. The result is a complete playing area of 49′-6″ wide by 79′-0″ long.

Court Court Dimensions
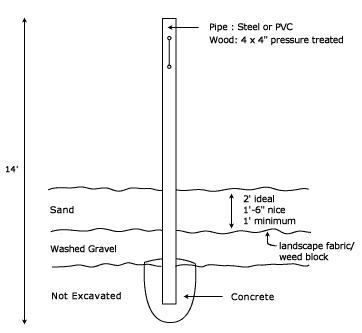
The pole may need to be longer in the northern climates. In northern climates footing should be located below the frost line. Locating the footing of the pole below the frost line will prevent “frost heave” of the footing. Check with the local building code for the frost depth.

When planning the layout pay special attention to the direction of the court. The court should run lengthwise North/South. If the court runs East/West, the court will be virtually unusable in the early morning say, for the start of a tournament and early evenings, such as playing after work. In the morning, the team on the West side of the court stares at the morning sun and in the evening, the team occupying the East court is blinded. The area above the playing surface should be clear and free of all obstructions such as tree branches and power lines.
To keep the sand in the court, where it belongs, and grass and dirt out, there are several schools of thought. The most popular solution is to line the perimeter with railroad ties. The railroad ties establish a very durable boundary, keep the sand in its place, and holds back the encroaching grass. On the downside, they pose a serious safety hazard. Some recommend padding the railroad ties with various materials such as foam pipe insulation, etc. I personally believe the simplest way to deal with the hazard is by establishing a ground rule: “If during the play of the ball, or the continuation after playing the ball, the player touches the railroad ties or leaves the playing area, the ball is dead.” This is much like an indoor rule that prevents a player from wildly chasing a ball that enters an adjacent court.
Preparing for the excavation
In most areas, excavating to a depth of 3 feet will be necessary. The first and foremost safety precaution is to call your local “Diggers Hotline” and have them locate any buried power lines and utilities. Be sure to call them ahead of time, as they may need a few days notice.
The best tool for the dig is a front-end loader or “bobcat” which can excavate the base evenly, remove the dirt, and also haul and spread the stone and sand. This equipment can be rented for a few hundred dollars for a weekend. If you’re not up to the task of handling heavy equipment, a good landscaping company can be contracted to excavate and haul the stone and sand. Excavate the playing area to the desired depth and pitch the base to one end or corner. A drainage ditch should be dug leading away from the court at its lowest point. Once the base is excavated you can begin laying the drainage pipe. The closed end of the drainage pipe should be placed in the highest point of the excavation and should zig-zag with the open end of the pipe terminating at the lowest point. The drainage pipe should be laid with the perforated side down. This allows water to wick-in from the bottom and sides and be carried away. It is an extremely good idea to wrap the drainage pipe with landscaping fabric before laying the pipe. The landscaping fabric prevents the eventuality of sand and dirt clogging the pipe.
Locate and dig the holes for the net standards. The holes should be dug at least 3′ deep and set in concrete. A couple of bag mixes per standard should do the job. Some home improvement centers carry a special “post setting mix” in which all the components for the concrete can just be dumped in the hole without prior mixing. Once the standard is located in the hole, plumb the standard in two opposing directions, and fasten supports so the post cannot move as the concrete is being dumped in the hole. Repeat this process for the opposite standard.
Filling it in
Once the poles are set, cover the base and drainage pipe with gravel and spread uniformly. Roll out and cover the gravel base with landscape fabric. The landscape fabric will keep the sand from filtering its way into the gravel. The final step is to spread the sand, uniformly and evenly throughout the playing area.


Follow Us!